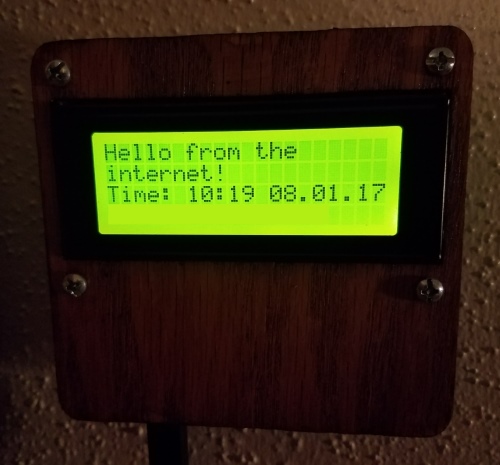
Last year I created a simple ESP8266 based Wifi display using a Wemos D1 Mini and a 4×20 character LCD – Video 1 – Video 2. I used a php script for the backend because I wanted it show the time without having to add an RTC, and I didn’t want to format messages on the board. The php script will generate a preformatted message for the board, so it just has to split out the 4 separate lines. This was great, but I want to change the messages a little bit easier.
Instead of using php this time, I went with Java which I’m much more familiar with, and will run the server on a Raspberry Pi. I have also set the wifi board to fallback to the old php script anytime the new Java server is unavailable. Since I’m using a Pi, it will be up and down a lot as I work on other projects, and don’t want the time on the display to be too far off. The message will change when it falls back, but I don’t mind.
Spark
I created a Java app using Spark, which is a Java web app micro framework based on statics and Lambdas. It starts up super fast, typically only a couple hundred millis, and is very lightweight. This works great on something like a Pi or shared environments where resources are limited.
Spark Helloworld
import static spark.Spark.*;

public class HelloWorld {
    public static void main(String[] args) {
        get("/hello", (req, res) -> "Hello World");
    }
}
Thymeleaf
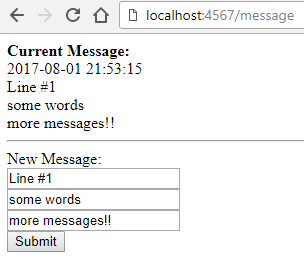
Spark also works with template engines so in addition to services, you can generate html pages. I used Thymeleaf to create a basic message editing page that will display the current message.
To send a Thymeleaf template response with Spark, create a Thymeleaf TemplateEngine and return the result of the engine.render method in your response:
private static final TemplateEngine thymeleaf = new ThymeleafTemplateEngine();
...
Spark.get("/yourPath", (req, res) -> {
  Map<String, Object> model = new HashMap<>();
  model.put("templateVariableName", value);
  model.put("variable2", message2);
  return thymeleaf.render(
      new ModelAndView(model, "templateFileName")
  );
});
build.gradle Dependencies
compile group: 'com.sparkjava', name: 'spark-core', version: '2.6.+'
compile group: 'com.sparkjava', name: 'spark-template-thymeleaf', version: '2.5.5'
Basic Auth
I didn’t want just anyone to be able to change the message, so I added an HTTP Basic Auth filter using QMetrics Spark Authentication library to require a username and password. This was the easiest route to get a minimal level of security, but please note that basic auth is not safe for plain text http connections and should only be used over https. Basic auth actually sends the username and password as a Base64 encoded header string, so without https anyone can decode them. In this case though, there is minimal risk.
Spark.before(new BasicAuthenticationFilter(
		"/*", new AuthenticationDetails(user, pass)));
build.gradle Dependencies
compile 'com.qmetric:spark-authentication:1.4'
Fatjar
I wanted this app to be easy to run. Spark uses Jetty as an embedded http server, so it starts fast and there are only library dependencies, with nothing extra to install. A standard build will generate one jar with your code in it, but all the other libraries still need to be packaged together somehow. In the past, these would have been bundled together in a folder inside of a zip file, but a better approach is to use a fat jar.
Gradle helps make this easy. You need to create a new build task to tell Gradle to include all the dependencies in the built jar, and to set the main class in the Manifest to make it a runnable jar. Now there is just one self contained jar to distribute which could be run with java -jar your-fat-jar.jar
Gradle fatJar task
task fatJar(type: Jar) {
	manifest {
        attributes 'Implementation-Title': 'ESP8266 Wifi Display',
          'Implementation-Version': version,
          'Main-Class': 'com.mikelduke.java.wifidisplay.WifiDisplay'
    }
    baseName = 'spark-wifi-display-all'
    from { configurations.compile.collect { it.isDirectory() ? it : zipTree(it) } }
    with jar
}
Gradle Build Command
./gradlew fatJar
Run it
I created a shell script to start the spark-wifi-display on my pi which can be run on startup. This script starts the java app in the background so it doesn’t need a user session and sets the property the app uses to set what port the server runs on.
#!/bin/bash

nohup java -Dserver.port=8081 -jar git/ESP8266WifiDisplay/spark-wifi-display/build/libs/spark-wifi-display-all-1.0.0.jar &
Run on Heroku
The spark-wifi-display app can even be deployed and run on Heroku. It’s probably not a good choice for a free dyno though, because the wifi module will hit it repeatedly. Heroku will sleep (turn off) free dynos for 6 hours a day, so it won’t be always on and will eat up the free pool of hours doing something which is fairly pointless, but it is possible.
To enable running on Heroku, I had to add a stage task to the gradle build and create a Procfile to hold the run command.
Gradle Build Task
task stage(dependsOn: ['build', 'clean'])
build.mustRunAfter clean
stage.dependsOn(fatJar)
Procfile
web: java -Dsecured=true -Dserver.port=$PORT -jar spark-wifi-display/build/libs/spark-wifi-display-all-1.0.0.jar
The secured property is set to true since this will be available on the internet after it’s deployed. The username and password can be set in the Heroku settings page as environment variables.
Use it
The edit message page is on the root ‘/’ for example http://your-ip:8080/ and the message formatted for the display is on ‘/message’ or as an example http://192.168.1.1:8080/message